Whilst doing some research on reverse engineering I came across a useful tip on the Tipping Point MindshaRE blogs. The post details the (simple) steps required to add IDA Pro‘s disassembly to Window’s right-click context menu.
This is definitely simpler than I had expected it to be,although admittedly not something I had investigated before. Judging from the comments to that post the world and his dog already knows how to do this, but I didn’t so I thought I’d share in case anyone else finds this useful aswell. (And it will give me an easy place to find the information again should I forget 😉 )
Instructions, courtesy of Tipping Point:
- Open “regedit.exe”
- Open the key “HKEY_CLASSES_ROOT”
- Locate the file extension class you want.* (“dllfile” and “exefile”)
- Open the sub key “shell”, it the key does not exist create it
- Create a new key
- Give it the text label you want displayed when you right click the file type
- Create another key under the label and name it “command”
- Open the “(Default)” key under the newly created label key
- Add the path to your installation of IDA Pro’s idag.exe binary in double quotes followed by “%1”
- Repeat for any other file extensions you want
- Close “regedit.exe”
Edited Registry: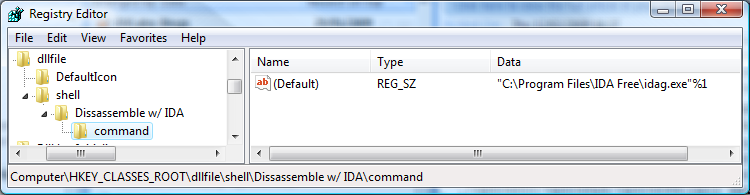
Right click in action:
— Andrew Waite
Just taken this a step further, to remove the muppetry factor I rename all malicious or potentially malicious files as *.VIRUS. Rather than just selecting the file extension to modify, add the extension to the list and continue as shown. Makes life easier, and safer
Good points all around. Truly apcpreiaetd.