DokuWiki and the the BeerWare License

I’m trying to do a better job of documenting the systems that make up InfoSanity. To do that it’s everyone’s favourite, a wiki. In this case I went with DokuWiki, for no real reason other than it came up first on a Google search. Installation is simple on a Debian based system, just the usual: apt-get install dokuwiki. So far so good, but I’m wondering how long I can actually keep the documentation upto date…
At the same time I came across the the BeerWare license from my Twitter feed (sorry, can’t find original message, thanks to whoever pointed me in the right direction. The license was created by Poul-Henning Kamp, and does a good job of summing up my feelings toward the tools/scripts I’ve released the last few years:

/*
 * ----------------------------------------------------------------------------
 * "THE BEER-WARE LICENSE" (Revision 42):
 * <phk@FreeBSD.ORG> wrote this file. As long as you retain this notice you
 * can do whatever you want with this stuff. If we meet some day, and you think
 * this stuff is worth it, you can buy me a beer in return Poul-Henning Kamp
 * ----------------------------------------------------------------------------
 */

So, why not combine the two together? DokuWiki has the ability to apply one of several standard licenses by default, but unfortunately BeerWare isn’t one of them. To correct this obvious mistake edit /etc/dokuwiki/license.php to include:

$license[‘beerware’] = array(
‘name’ => ‘Beerware License’,
‘url’  => ‘http://en.wikipedia.org/wiki/Beerware’,
);

n.b. I struggled to find a better license location that just deals with the license, if anyone finds better let me know.
Now it’s just a matter of editing the main dokuwiki config file, /etc/dokuwiki/dokuwiki.php:

$conf[‘license’] = ‘beerware’;

And Voila!
Dokuwiki showing the BeerWare License–Andrew Waite

SSH hardening with Breakinguard

As proven by the logs generated by Kippo honeypot sensors have shown, attacks against SSH services are regularly seen in the wild. Even if you follow best practices for securing the service, the malicious scans will utilise resources available to your environment; CPU, bandwidth etc. In sufficient volume legitimate operation may be impacted as the server rejects failed login attempts.
This is where utilities like Breakinguard come into their own. Basically Breakinguard monitors log files for signs of malicious activity, and once a single source has triggered enough alerts blocks all connections from the source location. Other utilities (most notably fail2ban) perform the same activities, but I’m partial to Breakinguard due to it’s small size and simple configuration (and from knowing the author 😉 ).
Installation is straightforward, and for the most part automated. Once downloaded and extracted installation is handled by the configure script. On Debian based systems this will install the pre-requisite Perl modules and transfer the utilities components to the standard locations:

  • breakinguard script – /usr/local/sbin/breakinguard
  • config – /etc/breakinguard.conf
  • init script – /etc/init.d/breakinguard

Once installed you need to edit your configuration. The breakinguard.conf file is fairly self explanatory, I normally edit:

  • $alert_email -> set to the email address that you want to receive notifications of blocked attacks. On a publicly accessible system these alerts can be high volume, you may want to use a specific email account or at least setup some auto-move rules in your email client to avoid your inbox being spammed.
  • $number_of_attempts -> This specifies the number of malicious log entries need to be generated by a specific IP address before the source is blocked. Due to the timing of the Breakinguard route this isn’t always an exact science, the default of 5 does a good job of avoid false positives whilst still blocking an attack in it’s infancy.
  • $log_to_watch -> selects the logfile to monitor for signs of malicious activity. /var/log/auth.log is the obvious choice on a Debian based system.
  • @safe_ips -> This array allows you to specify a number of trusted networks that will not be blocked, regardless of the number of times the they trigger alerts in the logs. This is useful for insuring that you don’t get locked out of your own systems in the event your keyboard ‘breaks’. On higher end systems with hardware remote management systems (iLo, DRAC, etc.) or virtual systems that provide remote access to the ‘physical’ console I leave this list to local subnet only and use the alternative options to access the server if I do lock myself out.
  • $DEBUG -> set to 1 by default, this runs the utility in test mode without actually blocking malicious sources, perfect for testing configuration before going live. Once you’re good to set set $DEBUG to 0 and wait for the attacks to start. Example testing in debug mode is below:

Breakinguard - Debug Mode

Blocking and unblocking of malicious sources is handled via iptables. Once the $number_of_attempts limit is hit Breakinguard will run the $block_command (configurable in /etc/breakinguard.conf) which by default is ‘/sbin/iptables -I INPUT -s %s -j DROP’, with %s being replaced with the attacking IP. After a configurable timeout ($block_length), the $unblock_command removes the restriction.
You can see the IP addresses currently blocked as they are listed in /var/run/breakinguard/, alternatively listing the current iptables configuration will show sources currently being blocked, for example:
Breakinguard iptables

Download Breakinguard here
–Andrew Waite

Updating Dionaea

I’m sure this is basic for most of you, but I seem to keep making the same daft mistakes whilst updating Dionaea, so I’m hoping documenting the issues and corrections will work as a memory aid in the future.
Firstly, I can never remember Git’s equivalent to ‘svn update’, which is:

git pull

Next up is recompiling Dionaea from your updated source directory, this is no different to an initial install as per Markus’ excellent instructions.
I keep forgetting to update my configuration file to include any directives needed for the new shiny new functionality you’re upgrading to get access to. I find diff useful for identifying any new additions, for example

/opt/dionaea/etc/dionaea# diff dionaea.conf dionaea.conf.dist

Assuming there’s no major changes you should only see differences specific to your installation, for example your email address to receive analysis reports, or your VirusTotal api key. If there are any other differences you’ll need to add the new content.
From the experience I’ve had in the past week, if you encounter any unexpected problems after updating Dionaea, make sure your pre-requisites are also upto date. After updating Dionaea last week to gain access to the new integration with VirusTotal’s api my Dionaea sensor started to die randomly. Markus was a great help with troubleshooting (thanks again) and my problems were eventually corrected after it was noted that my libemu installation was outdated; after a quick ‘git pull’ and ‘make’ (again following Markus’ instructions).
As I said, this is probably basic for most of you out there, but as I keep making similar mistakes I plan to refer back to this list of daft issues before bugging anyone for support in future. You never know, it might allow someone else to retain an air of competence before proving otherwise 🙂
— Andrew

ToonCon

I’ve been lax in writing this, so apologises.ToonCon Logo
Recently the already vibrant social networking scene in Newcastle Upon Tyne gained another group, ToonCon. What is ToonCon?
 

ToonCON is a monthly meeting and yearly conference in Newcastle-upon-Tyne of people with an interest in information security, these people include security professionals, students and hobbyists. We attempt to meet once a month at a local venue in the heart of Newcastle city center to discuss information security, drink b33r and have a good time. Our chosen venue will have free WLAN access, be quiet enough to have a decent conversation, have wheelchair access and be safe enough to leave your new gadgets and laptops on the table. At this moment in time we are still deciding on a venue, if you know of one that fits the description above, let us know!

After two events, ToonCon has so far lived up to billing, with plenty of infosec debate on a whole range of topics. With attendee’s experience ranging from students who are still learning the ropes, to those who have been on the frontlines for many years, all are welcome and everyone has something to both offer and gain from the discussions.
If you’ve got an interest in keeping information secure (or accessing supposedly secure information) and in the North East why not get involved?

— Andrew Waite

gnuplotsql.py

Development of new features for Dionaea has been fairly impressive of late, and I’ve been lax in keeping up to date. When Markus asked if I’d tested the graph utility that he created and wrote about here, it served as a kick to stop putting off some of the jobs I’ve got on the growing to-do list.
I won’t go into too much detail about running the script as Markus has already done a better job than I could. However I will point out that if you run your Dionaea installation on Debian stable, then your out of luck; the standard packages for sqlite are too old to take the script. Best advice is to copy your logsql.sqlite database to a Ubuntu machine and work from there (oh, and in case you didn’t guess from the script name, make sure you’ve actually installed gnuplot…).
A powerful machine is recommended, the only Ubuntu system I had to hand whilst testing was my AA1 netbook, which took 85 minutes to crunch through the script and my database.
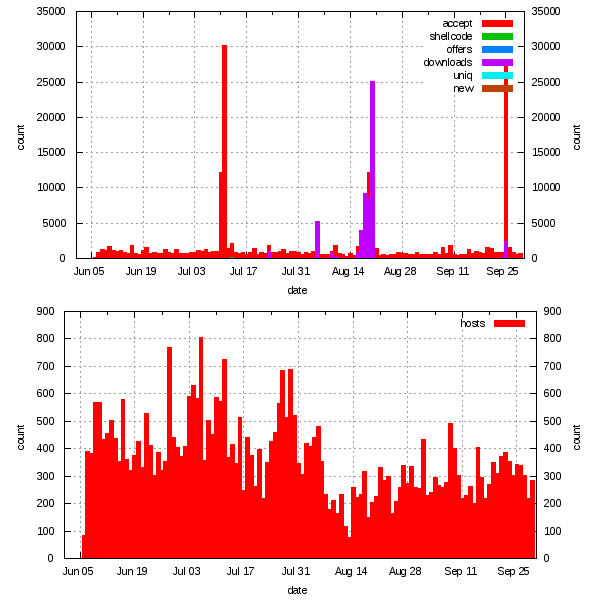
I have immediately found the graphs produced useful as they’ve highlighted a couple of obvious spikes (see below) in activity that I would have (and did) miss if solely relying on log files and databases. This really shows the power and importance of visualising security and log information.

dionaea-overview
dionaea-overview - from gnuplotsql.py

If you’re interested the output for the InfoSanity’s installation is now online here. I’m looking to expand the statistics from the InfoSanity honeypot environment that are publicly available, this makes a nice start. As always, big thanks to Markus and carnivore.it team for the effort.
— Andrew Waite

Mercury – Live Honeypot DVD

<UPDATE>Live download mirror: carnivore.it</UPDATE>
Mercury Live DVD was initially (I believe) announced in a post to the Nepenthes Mailing list. It is a remastered Ubuntu distribution with pre-installed honeypot applications and malware analysis tools created by John Moore. From the ReadMe:

This live DVD is a remastered version of Ubuntu 10.0 Beta LTS x86_32. It was designed due to my being disappointed with another reverse engineering malware live CD that was released recently. I have decided to call my creation MERCURY, which is an acronym for Malware Enumeration, Capture, and Reverse Engineering.
The Mercury live DVD contains tools used for digital forensics, data recovery, network monitoring, and spoofing. It should primarily be used as a honeypot or network monitoring platform as well as a laboratory and teaching aid. There are three honeypots installed – honeyd, nepenthes, and dionaea. Four, if you include netcat.

The majority of the additional applications reside in /opt:

  • Dionaea (0.1.0) – Dionaea is a malware collection honeypot focusing primarily on SMB emulation, covered on InfoSanity numerous times before.
  • FFP – Fuzzy Fingerprinting is a util to aid SSH MitM attacks.
  • jsunpack-n – Is a Javascript unpacker, perfect for analysis captured or potentially malicious URLs in more depth.
  • Kippo (svn rev.169) – Kippo is an low-medium interaction SSH honeypot, Also covered
  • mitm-ssh – Unsurprisingly, a utility for aiding man in the middle attacks against SSH connections.
  • Origami & pdftools – Two frameworks for analysing malicious PDF files.
  • Volatility – an excellent memory analysis toolkit
  • Zerowine-vm – A malware behavior analysis platform. I’ve covered ZeroWine here before, and whilst I find it useful for initial analysis I found it a pain to setup and get running. The fact this works out of the box on Mercury is enough reason alone to keep the .iso handy.

Other tools are installed on the system as started, access from standard locations (/etc, /usr/bin, etc.). I won’t try to list them all, but some highlights include:

  • Nepenthes – Dionaea’s predecessor
  • Honeyd – Honeypot system, perfect for emulating multiple different systems from one platform. Covered in more depth here.
  • John – John the Ripper, password cracker
  • ircd-hybrid – irc server daemon, useful for analysis irc-based malware’s interaction with command and control systems.
  • Snort – de-facto intrusion detection system.
  • Wireshark – Packet capture and network analysis tools.

I could go on, but I’m sure you get the idea.
Setting up a honeypot, and analysing the results, has never been easier. And I’m sure the toolkit’s functionality will also be useful in other scenarios; incident response, general network administration or as a safe learning platform. So what are you waiting for?
–Andrew Waite
N.B. there have been several mirror’s and downloads established, the most reliable download source I’ve used is Markus’ mirror at carnivore.it

Disaster Protocol 13 Interview

This week I was interviewed for the Disaster Protocol Security Podcast. My theory is that everyone else was superstitious and didn’t want to risk being on number 13, so they got stuck with me…..
Basically, the interview is just me talking about honeypots and some of the results and findings that have been discussed discussed both on this blog and via Twitter. Hopefully you’ll find it an interesting listen, and hopefully you’ll be able to understand me. Seems a few people have struggled so I’ll need to work on my ‘BBC English’ next time around….
Always interested in hearing others thoughts or comments on honeypots or infosec in general; so if you liked, disliked or disagreed with any of the content let me know.
The podcast episode can be downloaded here.
–Andrew Waite

Kippo SVN build

This morning I cause myself a problem. Annoyingly it was foreseeable and avoidable, this is my excuse (not great, but I’ll stick to it). But as every problem is merely an opportunity in disguise whist I’m re-building systems I might as well document the process. The original InfoSanity guide for installing Kippo was based off of the latest stable version, but I rapidly migrated to the development SVN on learning of the MySQL logging capabilities, so this guide covers that.
Packages
As I’m using a Debian system a lot of the system pre-requisites are packaged, this aren’t all needed immediately but we might as well grab them all at once.

apt-get install subversion #for svn
apt-get install python-twisted python-mysqldb # Python and required modules
apt-get install mysql-server #

Basic Kippo setup
Grab Kippo direct from svn, at time of writing I got version 160. (latest instructions):

svn checkout http://kippo.googlecode.com/svn/trunk/ /opt/kippo-svn

Now we can start the honeypot system:

./start.sh

That’s it, all that is required to get the system running. To confirm you can ssh locally with ssh -p2222 root@127.0.0.1, unless you’ve jumped ahead and edited the config, password will be 123456.
MySQL
Log into MySQL via commanline, assuming you’ve not modified the kippo.cfg database directives build the database:

create database kippo;
grant all on kippo.* to ‘kippo’@’localhost’ identified by ‘secret’;

Next edit the kippo.cfg accordingly you database/user/password and uncomment the [database] configuration directives. REMEBER to uncomment ;[database] line not just the parameters, that has now caught me out twice.
Finally, build the database structure with the script that can be found in <kippo>/doc/sql/:

doc/sql/# mysql -ukippo -psecret kippo < mysql.sql

Restart your Kippo process and you should be good; re-test access to the shell and view the database tables to confirm that logs are being written to the database.
Happy Honeypotting
–Andrew Waite

    Basic SSH server hardening

    When discussing some of my recent findings with Kippo I’ve been asked a few times for suggestions for how people can prevent their systems from being compromised via this vector. A quick Google search shows that there are already a number of good resources covering the options, including: Debian Administration Article and Securing Debian Manual. However, the high number of options can leave people unsure where to start so I’ll summarise some of those that are more common and can provide the highest return on investment for the time taken to make the change.
    N.B. a lot of the suggestions below are valid for most/all remote access functionality.
    Restrict access from unknown locations
    If possible (it isn’t always) restrict access to only come from known and trusted sources. This can be down at multiple choke points in the network and system; perimeter firewall, host firewall (iptables etc.) or sshd config. For working with sshd the /etc/hosts.allow and /etc/hosts.deny, for example:
    /etc/hosts.allow

    #Corporate HQ gateway
    sshd: 1.2.3.4/255.255.255.255

    /etc/hosts.deny

    #Generic Deny All
    sshd: ALL

    It doesn’t matter how insecure your system is, if an attacker can’t connect and communicate with a vulnerable service they can’t exploit it, period.
    Restrict remote root access
    Preventing remote access to the root account can reduce the damage that can be caused by a compromised. With SSH this can be achieved with a single configuration line:
    /etc/ssh/sshd_config

    PermitRootLogin no

    Only allow access to specific accounts
    Does every account on you system need to be able to remotely access the system via SSH? No? Then why can it?
    Remote system access can be restricted on a per user basis. This can be either as a whitelist using the AllowUsers directive or as a blacklist with the DenyUsers directive. For example, if I only wanted to allow my own account access via ssh:
    /etc/ssh/sshd_config

    AllowUsers andrew

    These capabilities can be useful with certain honeypot systems; if you create a weak user account linked with an ftp or pop3 honeypot (for example), then the same weak accounts can be prevented from gaining access to a shell with the DenyUsers directive, limiting the weak account to only access those services that are being monitored.
    Run on non-standard port
    Yes, this is ‘security by obscurity’; if this is the only change you make you haven’t really improved security any, but it is still useful as part of wider security posture. Attackers are continually scanning the internet looking for new systems to exploit, currently the ISC statistics show connections to tcp22 at around 100k targets; even moving to a relatively common alternative port of 2222 drops the malicious traffic by around 90%.
    /etc/ssh/sshd_config

    Port 2222

    This reduces the number of malcious attempts targeting the service, which will both reduce processor/network load and ‘noise’ in the log. If you now get a burst of failed log-in attempts in the logs, then this may be indicative of a specific attacker rather than just the usual background noise of bots and worms scanning for new victims.
    Summary
    Implementing the above can drastically improve SSH security above the defaults, with a relatively small effort required providing a great ROI. So what’s your excuse? Go harden that SSH installation
    –Andrew Waite

    Example of post exploit utilities (SSH scanners)

    So far my Kippo honeypot installation has recieved a number of successful log ins from maliciuos users, some of which have been helpful enough to provide some tools for further analysis. A lot of the archives which have been downloaded show that the kits have been in use for a while, with some archive timestamps going back as far as 2004 (of course this could simply be an incorrect clock on the machine that created the archive). Picking on the most recent download (2010-07-18) I’ve taken a look at the archive containing gosh.tgz.
    The archive was downloaded from linux<dot>hostse<dot>com<slash>gosh<tgz>, system is down at time of writing but take care if attempting to investigate yourself. Before downloading the user checked around the system with commands: w, uname -a and cat /proc/cpuinfo, and archive was downloaded and extracted in /dev/shm/.
    Once extracted, the archive contains a number of files:

    1: ISO-8859 English text, with CRLF line terminators
    2: ASCII text
    3: ASCII C++ program text, with CRLF line terminators
    4: ASCII text
    5: ASCII text
    a: ISO-8859 text, with CRLF line terminators
    common: ASCII C++ program text
    gen-pass.sh: Bourne-Again shell script text executable
    go.sh: ASCII text
    mfu.txt: ASCII text
    pass_file: ASCII text
    pscan2: ELF 32-bit LSB executable, Intel 80386, version 1 (SYSV), dynamically linked (uses shared libs), for GNU/Linux 2.2.5, not stripped
    scam: Bourne-Again shell script text executable
    secure: Bourne-Again shell script text executable
    ss: ELF 32-bit LSB executable, Intel 80386, version 1 (SYSV), statically linked, for GNU/Linux 2.0.0,stripped
    ssh-scan: ELF 32-bit LSB executable, Intel 80386, version 1 (SYSV), statically linked, for GNU/Linux 2.0.0, stripped
    vuln.txt: empty
    • Interesting files:
    • Files 1 to 5, common and pass_file are password lists, totalling 235,523 potential passwords.
    • mfu.txt is a list of IP addresses, mostly in the 38.99.0.0/16 address space.
    • pscan2 is a fairly common and generic port scanner.
    • scam is a shell script that appears to be the core brains of the toolkit. It essentially looks through scanning a different ranges of IP addresses while periodically emailing the contents of vuln.txt back to it’s master (mafia89tm@yahoo.co.uk).
    • ss: appears to be another scanner used for looking for potential targets.
    • ssh-scan: appears to be a Romanian tool from the message provided if run without arguments, according to Google Translate (possibly NSFW), and as you would guess from the file name is a scanner for SSH services.
    • vuln.txt is blank in the archive, and will be the output of vulnerable systems located by the scanners.

    All told this appears to be a kit for performing further scans for unsecured SSH sessions, and it is likely that a similar kit hosted on a different compromised machine was responsible for identifying my installation in the first place. Kits like this also quickly show the problem with tracking down the malicious user behind an compromise or attempt, it is rare for attacks to be launched from systems that can easily be traced back to the malicious user.
    A quick Google search confirms that this kit (and user) has been seen in the wild attacking other systems, this posting on the Shell Person blog writes up the aftermath after a production system was compromised by the same kit.
    –Andrew Waite