I don’t normal bother with analysing spam, however two received yesterday caught my attention. Mostly they were noticeable as they avoided my usually bulletproof filters.
Both spam emails are similar in subject, content, and sending options. Sender address was spoofed (surprise, surprise) in this case I supposedly sent the email myself, from the same account as the destination. This is a technique that I’ve started seeing more frequently, I’m assuming that this is to bypass sender white/black-lists.
Content is a single line, ultimately linking to a ‘medication’ sales site. (hxxp://plfctqvlam.wipvoqen.cn/ and hxxp://sbuih.gukceyiq.cn/ [Standard Disclaimer: Links may be nasty, don’t blame me if they do nasty things to your machines]). Fortunately, or unfortunately depending on your point of view, Wepawet analysis states the sites are benign so no interesting samples for further analysis.
As expected both URLs are linked, being hosted on the same 3 IP addresses: 58.17.3.44, 58.20.140.5 and 220.248.167.126 [same disclaimer as above]. Whois records show that the IP addresses belong to separate organisations, but ultimately all IP addresses are allocated by “China Unicom Hunan provincial network”, AS9929.
Nothing groundbreaking in any of this, just a (slightly) interesting way to kill 30 minutes on a sleepy Sunday afternoon.
— Andrew Waite
Update (2009/04/28): Spam run is still continuing and still making it’s way through filters, but it appears to be changing tact, unsurprisingly, to take advantage of recent Swine flu concerns. Last email body “Swine flu coming? We know how to protect you from it hxxp://osdns.hencedix.cn/” Usual warning and disclaimers apply
Update 2 (2009/04/29): Looks like a wide spread spam run, Malware City have just posted some analysis on the same emails.
Update 3 (2009/04/29): Great write-up by Dancho Danchev on his blog (more domains than I’ve seen personally). Also include a nice diagram of the DNS/server infrastructure in use, nice work Dancho.
Breaking WEP
‘WEP is insecure and breakable’ – No surprise here, everyone knows this is the case. But there can be a large difference between knowing something is theoretically possible and seeing the security provisions fall over merely by being looked at. Recent InfoSanity research has shown WEP is still found on 30% of real-world access points. This means that WEP security is still a valuable skill for anyone working within information security.
One of the best sources for wireless security information is the Aircrack Project (site currently unavailable, Google cache can be of assistance for the impatient). The tutorial section of the site contains many great walkthroughs and guides to all aspects of wireless security I’m not going to attempt create an all encompassing guide to WEP security, but merely to provide a real-world example of compromising WEP.
First phase of any wireless compromise is to locate and identify the target network, this could be achieved with any number of tools, personally I activate airodump-ng from the aircrack suite with minimal parameters (bt ~ # airodump-ng wlan0). From the target network collect the station MAC address (BSSID), network name (ESSID) and operating channel.
Whilst not a necessity, testing the ability of your equipment to inject packets into the target network can prevent wasting time and resources with an unsuccessful compromise attempt. The ability to inject packets will have a large impact on the ability to compromise a WEP key and the time required to make the compromise. Again the Aircrack suite has good tools for the job, this time in the form of aireplay. In my case the required command was:
bt ~ # aireplay-ng –test -b 00:0F:B5:DC:DE:B7 -e mist wlan0
where -b and -e parameters are the targets BSSID and ESSID respectively. The output will show if packet injection is possible, and the reliability of that injection. The Aircrack documentation states that injection rate should be at or near to 100%. Whilst this is beneficial, I have successfully completed an engagement with injection as low as 15%.
Next step is set up a packet sniffer, airodump does the job nicely. Adding some additional parameters ( -c # ) to fix the capture to the targets operating channel will increase success rate and reduce capture times as your card doesn’t lose packets whilst channel hopping across the wireless spectrum. Again, in my case I used:
bt ~ # airodump-ng -c 13 –bssid 00:0F:B5:DC:DE:B7 -w WEP-example wlan0
-w filename, specifies the file to write captured traffic to.
Before injection packets, the injecting interface needs to associate with the target base station. Aireplay-ng to the rescue again:
bt ~ # aireplay-ng –fakeauth 0 -a 00:0F:B5:DC:DE:B7 wlan0
Aireplay-ng also provides a function for implementing an ARP injection attack:
bt ~ # aireplay-ng –arpreplay -b 00:0F:B5:DC:DE:B7 wlan0
This is where the packet injection ratio determined by the –test function comes into play, the Alfa card with RealTek 8187 chip in use during this engagement generally injects packets at a rate of 500 packets per second, in this scenario the test function report 92% success, airodump-ng reported capturing approx 490 packets per second.
Final stage is to actually crack the collected packets, Aircrack documentation suggests collecting 250,000 IV packets to ensure compromise. In this case I collected 100,000 packets and the key was cracked in under a second, in previous engagements I have successfully gained the encryption key with as few as 10,000 collected packets:
bt ~ # aircrack-ng WEP-example-01.cap
In this case overall engagement required less than 15 minutes from finding network point to obtaining network key. From here it’s trivial to get a machine connected to the wireless network, in many cases this provides direct access to the soft and fluffy internal network, and from there? World (target network) is your oyster…..
— Andrew Waite
Analysis of wireless statistics
As promised when the postman delivered the Alfa equipment, I’ve done some initial analysis of my first wireless capture. The data being analysed was collected during the evening commute back home, a trip that includes urban, sub-urban and rural areas so should be good representative sample group.
Security
The previous wireless post has already touched on the security aspect of the found access points. The chart below shows the breakdown between the the various security implementations. The WPA+ category includes WPA, WPA2 and WPA2WPA columns (as categorised by airodump-ng).
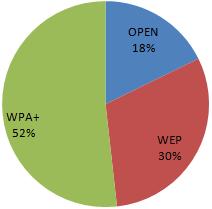 Due to the known insecurities within WEP, almost half of the encountered access points do not have any reliable security in place to protect the attached network and users of their networks.
Default Configurations
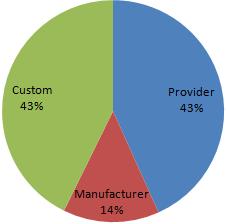
Most, potentially all wireless access points have the ability to be configured in a secure manner. However, a large percentage home and small office users are not aware of the security implications of wireless equipment or other computer technology. As a result the default factory settings that a wireless device is shipped with often provides the baseline security configuration. The below diagram shows that over 50% of the encountered access points were running in a default state (either provider or manufacturer settings) [n.b. assumption is based solely on essid]
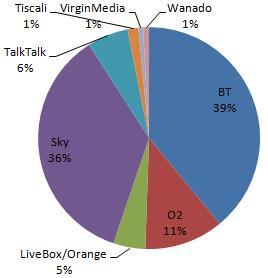
The issue is shown by the split of the BT Home Hub devices, BT are one of the major telecommunications providers within the UK. The initial Home Hub (with default ESSID of BTHomeHub-####) are, in this data set, exclusively protected by WEP. In contrast the majority of newer versions of the same device (ESSID: BTHomeHub2-####) operate with the WPA/WPA2 protocols. Another large UK telecoms player, SKY appears to take security of their provided devices seriously all encountered access points configured with SKY’s default ESSID (SKY#####) almost exclusively employ WPA. The chart below shows the provider breakdown of the encountered access points (obviously we are unable to determine the provider of access points with a custom ESSID), with the dominance of BT and Sky in this area the default configuration of their devices could be crucial for a large number of home users.
Custom ESSIDs
Whilst some default configurations are insecure, some modified configurations may inadvertently provide additional information to potential attackers. One advantage behind default configurations is that it can be difficult to determine the location or physical connections of any given access point, however the ESSID can provide a good probability of determining the physical connections. Numerous access points within the data have ESSIDs set to an address or individuals name, this is potentially unavoidable for businesses. Whilst security through obscurity can never replace solid security, some obscurity and misdirection can reduce risk and volume of compromise attempts. As a prime example, this data set includes an access point related (assuming ESSID is relevant) of a local branch of a national bank, more worryingly the access point appears to be running WEP.
A large volume of modified ESSIDs are given ‘humorous’ values or references to pop-culture. Some network names may be references/retorts from the network owners in response finding unauthorised users on the network, Dont-steal-our-network and we-know-who-u-are-thief. Both these networks run WPA2, potentially learning the security message the hard way.
The last network name that caught attention may be an attempt at offensive security, the ESSID reboot may potentially be an attempt to trip up malicious users parsing available networks through poorly considered shell script.
Summary
Within the dataset analysed the findings show that wireless infrastructure is becoming widespread. Further to this, the volume of default and insecure configurations may indicate that the usage and security implications of wireless connectivity may not be well understood within the general population. The growing trend of wireless enabled devices to be shipped with secure default configurations is a positive move within this field.
— Andrew Waite
Snort implementation on Debian
We’ve just completed the initial build for a new standalone IDS sensor running Snort. Having had previous experience (~1.5 years previously, manual source compile) I was amazed with the ease and speed with which the system was built, configured and operational.
I’ll spare most of the details as installation requirements will vary from environment to environment, but the basic steps are below:
- Installed OS, latest Debian build via net install.
- #apt-get install mysql-server
- Added blank database and associated user for use later
- #apt-get install snort-mysql
- Debian Snort package with support for MySQL database back-end, which is required for the Acid/Base web front end
- #apt-get install acidbase
- Debian package for the Acid/Base web front end.
Each stage required some additional configuration steps but all were intuitive, or solvable with a couple of minutes Google-Fu. Only real (and still minor) stumbling block was the Base front end initially complaining about the ADODB modules, as one of the Apt steps stated that this file had moved and would need fixing in the configuration we spent some time trying to locate the location within our installation. Only to find that all prerequisites weren’t met with the package installs, a quick #apt-get install php5-mysql rapidly fixed the issue and all was good with the world again.
Only task still on the To-Do list is to install the Debian Oinkmaster package to ease Snort rule updates and allowing finer grain control over the process. The sensor is now fully functional but still in need of some tuning to reduce the noise ratio of alerts.
A useful addition to the security toolbox in less than a few hours, not bad for an afternoon’s work.
— Andrew Waite
— Andy Rigby
VMware ESXi updates
A couple of SANs ISC diaries (“Recent VMware updates available” and “VMware exploits – just how bad is it?“) should be a concern for anyone running a VMware lab (or VMware production environment). The ISC diaries explain the situation better than I could, but to cut a long story short the exploits allow a malicious user/payload to escape the guest system and gain direct access to the host.
Looks like I know what I’ll be doing after work tonight. I’ll try to document the update process as I go, watch this space…
— Andrew Waite
Honeypotting with Nepenthes
If you’ve got an interest in information security, then there is a good chance that you’ve got a good handle on malware in all it’s (in)glorious forms. The books, articles and war stories are nice, interesting and can result in some improved knowledge but to get a real feel for malware nothing beats live samples. Best way to get live samples? Get infected! To manage this without bringing your network and organisation to it’s knees best practice is a honeypot, in one (or more) of it’s various forms.
For exactly this purpose I’ve been running the Nepenthes application for around 10 months. Nepenthes is a low interaction honeypot which emulates several known vulnerabilities across multiple services in an attempt to capture live malware samples as it is ‘exploited’. The Nepenthes services advertise known vulnerabilities, emulate service interaction to the point of exploit and final store the shellcode/binary provided by the malicious system.
If my honeypot system is any indication, these systems will and do get pounded heavily from prospective intruders, over the lifetime of my honeypot systm I have collected in excess of 850 unique malware samples. In fact when the system was first installed it captured it’s first malicious binary within 30 minutes of gaining a live network connection (in this case an IRC bot).
Nepenthes has the ability to automate a fair chunk of the analysis process by automatically submitting any collected binaries to one of several sandboxes (for example the Norman Sandbox). This can provide analysts with an immediate indication as to the type of malware being dealt with, and perhaps most significantly prevent analysts from utilising resources analysing essentially the same binary/malware. One word of caution however is that the submit process does not always work 100% (this hasn’t been investigated in too much detail, could be Nepenthes, could be the sandboxes not accepting/reviewing the file, could be the winds of fate. As with many things, your mileage may vary.)
As an example of the interactions and logging processed by Nepenthes, below is a log snippet of a malware sample that has just (literally) ‘exploited’ my honeypot. (N.B. IPs edited to protect the guilty):
[12042009 16:36:51 warn module] Unknown NETDDE exploit 76 bytes State 1
[12042009 16:36:51 warn module] Unknown SMBName exploit 0 bytes State 1
[12042009 16:36:51 info handler dia] Unknown DCOM request, dropping
[12042009 16:36:57 info sc handler] i = 1 map_items 2 , map = port
[12042009 16:36:57 info sc handler] bindfiletransfer::amberg -> 9988
[12042009 16:36:57 info sc handler] bindfiletransfer::amberg -> w.x.y.z:9988
[12042009 16:36:57 info down mgr] Handler creceive download handler will download creceive://w.x.y.z:9988/0
[12042009 16:37:12 info mgr submit] File 9604e9c99768c5cd2deb108935356196 has type MS-DOS executable PE for MS Windows (GUI) Intel 80386 32-bit
VirusTotal analysis of this file (MD5 hash: 9604e9c99768c5cd2deb108935356196) indicates it is a member of the Rbot family of malware. When working with and investigating the malware collected by Nepenthes I have found the VirusTotal Hash Search feature to be particularly useful as it allows analysts the ability to search VirusTotal’s extensive database to gain analysis of the file in question purely from the binary’s hash value. This means that you don’t need to transfer the binary itself between systems to upload to the VirusTotal for actual analysis, removing the potential for an unintended double-click causing havok on a network. And if VirusTotal hasn’t seen the file in question you may have something new and exciting to analyse yourself (or an old polymorphic binary….)
The downside of using a low interaction honeypot like Nepenthes is that you are not going to be collecting on the bleeding edge. As the process suggests, as Nepenthes emulates known vulnerabilities, the vulnerabilities in question need to be known and coded into Nepenthes before it will collect any malware exploit the vulnerability. For instance, dispite all the recent hype and media attention this honeypot system as not captured any sample of Conficker/DownAdUp. However, as most new malware will still utilise old vulnerabilities to increase potential targets this isn’t a major limiration (Conficker was somewhat unique in that it originally limited itself to the ms08-067 vulnerability, before expanding it’s repertoire with subsequent variants.)
Honeypots (of any variety) also provide a good return on investment even in environments where the analysis of malware isn’t a primary (or even secondary) concern. As the honeypot server has no legitimate services then the only traffic targetted at the honeypot should be malicious. Placed externally, this can provide an early warning system for attacks that eventually target legitimate systems and can give system administrations a better indication of the types and frequency of attacks that will be directed at live services. Placed internally they can help identify any internal infections, as compromised systems sweep the internal networks for other vulnerable hosts and trigger the honeypot. These logs can also help identify the root cause of any infectiona and potentially the initial infection vector.
Ultimately honeyput systems of all varieties have a myriad of beneficial uses. There is an enormous wealth of high quality information available from the various honey pot organisations, for example Shadowserver, the Honeynet Project and Carnivore.IT (home of Nepenthes).
–Andrew Waite
‘If you know your enemy and know yourself, you need not fear the result of a hundred battles’ – Sun Tzu
New Alfa wireless equipment
I’ve just taken delivery of, and started to experiment with, my new wireless equipment consisting of an Alfa AWUS036H and some additional antennas. My primary (official) motive for purchasing new hardware was that my primary incident response laptop only has 802.11b internal so can’t connect to newer networks (and I’ve just upgraded my home network to a 802.11g only access point).
Unofficial reason is that I have never owned a wireless device capable of packet injection and other advanced wireless penetration techniques. In this regard the Alfa comes very highly recommended, both from Aircrack’s own documentation wiki and from security guys in the field. In my testing so far the Alfa has performed admirably on all accounts.
In addition to the Alfa I acquired an additional antenna with magnetic mount, perfect for many tasks including mounting to the roof of a moving vehicle for a bit of data gathering. Despite being a life-long geek, I was still amazed by the concentration of wireless network devices available. In my first test I left my equipment running whilst I made the short commute from work to back home, during this trip I collected details of 1100+ access points and 250+ active clients.
From these straw poll statistics the level of security implemented was concerning although not completely surprising.
- 200+ of the access points were running with no encryption at all, whilst this is mitigated by the fact many appear to be (going from essid) publicly provided networks designed for guest use (for example BTOpenZone) many also appear to be for home use or merely devices in their default setting.
- 300+ of the APs were running with the provenly insecure WEP.
- The remaining 600+ access points were configured to use a combination of the more secure WPA and WPA2 frameworks, although less than 80 of these devices were configured to use the more recent and secure WPA2.
Best feature of my new equipment? New possibilities and ideas! So far my head is buzzing with new possibilities so watch this space. At a minimum I want to add a GPS reciever to my wireless arsenal; currently looking at the TripNav TN200 which was suggested by Antonio Merola in his SANS reading room paper Wi-Fi with Backrack. The device seems to get good reviews everywhere I’ve found, but the paper is slightly dated (2007), if anyone has any suggestions for better hardware let me know.
— Andrew Waite
Booby-trapped Javascript
Fortinet have just released a nice blog post highlighting and analysing some changes in the obfuscated Javascript they are seeing.
De-obfuscating javascript is (should be) straight forward as it is interpreted on the fly and you have the source code available (as opposed to a compiled malware binary requiring more advance RE techniques, as discussed in previous posts).
One basic change has been to include some debugger specific command calls, such as quit(), which stop the code from been executed in debugger or sandbox (Malzilla is a common favourite), but is generally ignored by most browsers. More of an annoyance than an actual problem, as the analyst has the source these extra commands can be removed manually, but will add extra time to the analysis and may catch out less experienced analysts. In the long term this may be a short-lived change and may prove to be beneficial to the prevention of malicious Javascript. As these commands should only useful when run under a debugger rather than a browser, such commands shouldn’t appear (or be very uncommon) in non-malicious Javascript. As such it may be possible to scan for and filter for Javascript containing these commands.
A slightly more worrying change (from an analysts perspective) is that it appears the malcode authors are growing smart to analysis techniques. As highlighted by Fortinet, a common method to gain de-obfuscated Javascript code is to replace the eval() calls with print(), causing the malcode to de-obfuscate itself and present the analysis with readable commands (sometimes requiring several iterations).
Fortinet have found examples of malicious Javascript overloading the print() function with code of their own. Potentially this code could do anything, the example detailed by Fortinet shows a deadly combination of commands ‘ls’ and ‘rm’ (assumes the analyst is running ‘nix) to give the analyst a really bad day.
One more reason to stick with lab environment when dealing with any potentially malicious code or files, even something as ‘harmless’ as de-obfuscating javascript.
Andrew Waite
Update: Discussion on The Ethical Hacker Network in response to this generated some interesting discussions and resulted in this very nice article by Dean for the Carnal0wnage Blog on detecting VMWare environments in Javascript. As Dean points out it’s a fairly pointless exercise from a malware perspective, but interesting non the less.
— Andrew Waite
P.S. Thanks to Lenny Zeltser for mentioning the post, may have missed it otherwise
RSS Feeds
Something I’ve been meaning to do for a while is document and keep a list of all the RSS feeds I’ve collected over the years, mainly because I can’t remember them all. Initially I had a mild panic as I couldn’t find any of the URLs from the feeds I’ve got configured through Outlook 2007, the usual guestimate of right-click>properties failed me. For those needing to do the same ‘File > Import and Export’ is your friend. Select the ‘Export RSS Feeds to an OPML file’ and the rest should be self explanatory to get all of your RSS info in XML form.
With panic over I’ve transferred all relevant links to the RSS page over at Infosanity. Hopefully you might find a few unknown gems amongst the list. If you’ve got some good feeds I’m missing please let me know and I’ll update accordingly.
— Andrew Waite
Dark Reading: DIY security lab
As I’m currently setting up and playing with my home research lab this article from Dark Reading caught my attention. The article doesn’t provide too much ‘new’ material to those that have researched security labs even in minimal depths, but it does focus on how security labs can provide cheap training to keep your skills sharp during the current economic current. I don’t want to paraphrase the article as it is all fairly self-explanatory, for those considering how to use a proposed or existing lab John Sawyers’ article suggests the following possibilities:
Before everyone signs off on the security testing lab, however, you need to answer several questions to determine the design and purpose of the lab. They include:
- Is the lab just for testing new security tools and exploits in a controlled environment?
- Will the lab be home to staged cyberwarfare, where multiple staff members are involved as either attackers or defenders?
- What about mock incident-response scenarios, where one team member “hacks” a system or pretends to be a disgruntled employee while the others are left trying to put the pieces back together?
The article does go on to suggest different hardware and systems for various flavours of labs but nothing particularly mindbending (VMWare for basics, more hardware required for larger labs, etc.)
— Andrew Waite